OpenCV Object Detection: Hands-On Guide for ML Teams

 CEO of Label Your Data
Table of Contents
- TL;DR
- Introduction to OpenCV Object Detection
- Setting Up Your Development Environment
- Understanding Key Techniques in OpenCV Object Detection
- Implementing OpenCV Object Detection Step by Step
- OpenCV Object Detection Performance Optimization
- Best Practices and Common Challenges
- Additional Resources
- About Label Your Data
- FAQ

TL;DR
- OpenCV is an incredibly useful, free, open-source resource.
- Learn how OpenCV object detection techniques work, from traditional methods to deep learning-based approaches.
- Set up your environment and implement real-time object detection OpenCV Python pipelines.
- Optimize performance for different hardware configurations and improve detection accuracy with best practices.
Introduction to OpenCV Object Detection
Curious how machines actually “see” objects? Let’s unpack the fundamentals of object detection using OpenCV.
What is Object Detection?
Object detection is a computer vision technique used to identify and locate objects within images and videos. It differs from image classification in that it provides bounding box coordinates around detected objects instead of simply labeling objects.
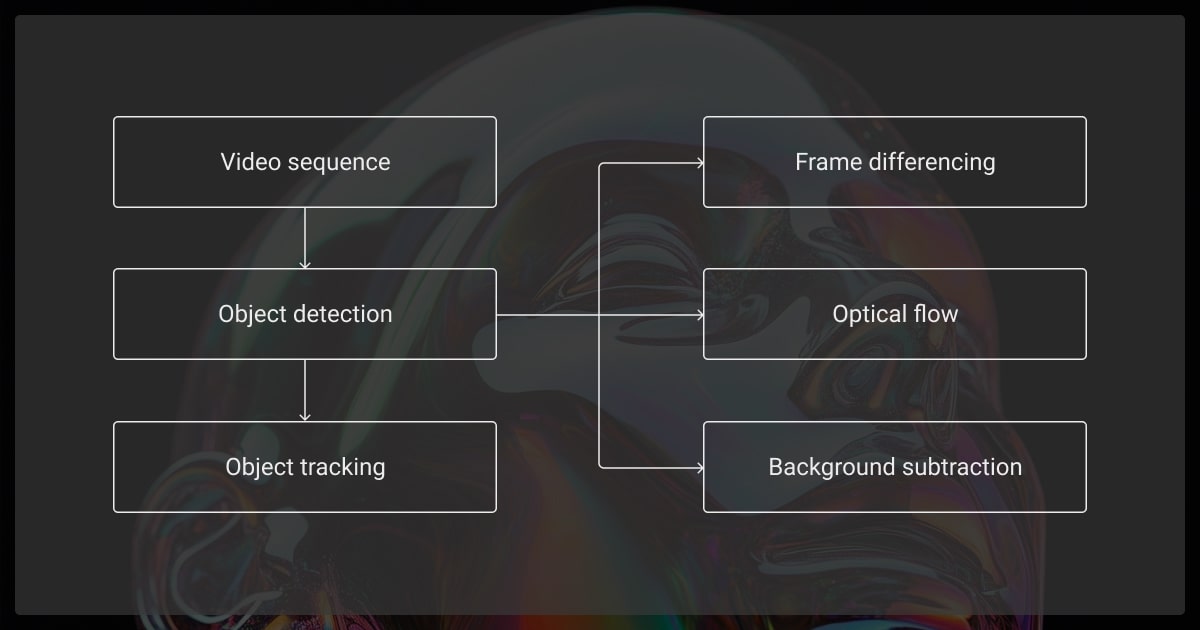
This technique not only tells the machine what it’s looking at, but also tells it where the object is in the image. This becomes especially important when it comes to object tracking. It’s an essential technique for applications like:
- Autonomous vehicles
- Video surveillance
- Augmented reality
Or any applications when you need bounding box annotation.
What’s image classification vs. object detection? The former basically defines the entire image. The latter defines a part of the image.
Why Choose OpenCV Object Detection?
OpenCV (Open Source Computer Vision Library) is one of the most popular open-source frameworks for computer vision tasks. It includes object detection OpenCV implementations and provides:
Efficiency
OpenCV is optimized for real-time processing and can run on various hardware, from CPUs to GPUs. With real time object detection OpenCV Python, you can label objects faster and note their positions. This improves image recognition later on.
Flexibility
It supports both traditional machine learning and deep learning-based methods. You simply choose the right one for your application.
Comprehensive Tools
It has built-in functions for image processing, feature extraction, and model inference.
Setting Up Your Development Environment
Here’s how to set up everything you need to start building with OpenCV.
Required Libraries and Tools
To get started with OpenCV object detection Python, you’ll need:
- Python 3.x
- OpenCV (cv2 module)
- NumPy (for array manipulations)
- Matplotlib (for visualization)
- TensorFlow/PyTorch (for deep learning models like YOLO, SSD, and Faster R-CNN)
Installation Guide
| Purpose | Libraries to Install | Command |
| Core functionality | OpenCV, NumPy, Matplotlib | pip install opencv-python numpy matplotlib |
| Deep learning (TensorFlow) | TensorFlow, Keras | pip install tensorflow keras |
| Deep learning (PyTorch) | PyTorch, TorchVision | pip install torch torchvision |
Understanding Key Techniques in OpenCV Object Detection
Discover the core object detection methods—from old-school classics to modern deep learning powerhouses.
Traditional Methods
Before deep learning, object detection and data annotation relied on hand-crafted feature extraction. The two most common methods are:
Haar Cascades
With this technique, you train the model by giving it examples of positive images you want it to identify. You’ll also use negative images to show the model what to ignore.
- Uses Haar-like features and an Adaboost-based classifier
- Works well for face detection but struggles with complex objects
- Requires pre-trained XML files for detection (e.g., haarcascade_frontalface_default.xml)
Example:
| Code | Description |
face_cascade = cv2.CascadeClassifier('haarcascade_frontalface_default.xml') | Loads a pre-trained Haar cascade for detecting frontal faces. |
gray = cv2.cvtColor(image, cv2.COLOR_BGR2GRAY) | Converts the image to grayscale, as required by the detector. |
faces = face_cascade.detectMultiScale(gray, scaleFactor=1.1, minNeighbors=5) | Detects faces with scaling and neighbor settings to control detection accuracy. |
HOG (Histogram of Oriented Gradients)
A feature-based method that detects objects by analyzing edge directions. Effective for identifying pedestrians in images.
- Extracts edge-based features and uses an SVM classifier
- Performs well on pedestrian detection
- More robust than Haar cascades but computationally expensive
Example:
| Code | Description |
hog = cv2.HOGDescriptor() | Initializes the HOG (Histogram of Oriented Gradients) descriptor. |
hog.setSVMDetector(cv2.HOGDescriptor_getDefaultPeopleDetector()) | Sets up a pre-trained SVM model for pedestrian detection. |
detections, _ = hog.detectMultiScale(image, winStride=(8,8)) | Detects people in the image using a sliding window approach. |
Deep Learning-Based Methods
Modern object detection OpenCV Python pipelines rely on deep learning. This improves accuracy and speeds up the process. You can measure the performance of YOLO and Fast R-CNN by checking the mean average precision (mAP).
YOLO (You Only Look Once)
This model is the fastest object detection model, making it popular for real-time applications. It uses a single neural network pass to detect objects, which means that it uses fewer resources. A great option if you want to reduce data annotation pricing. It’s available via OpenCV’s DNN module.
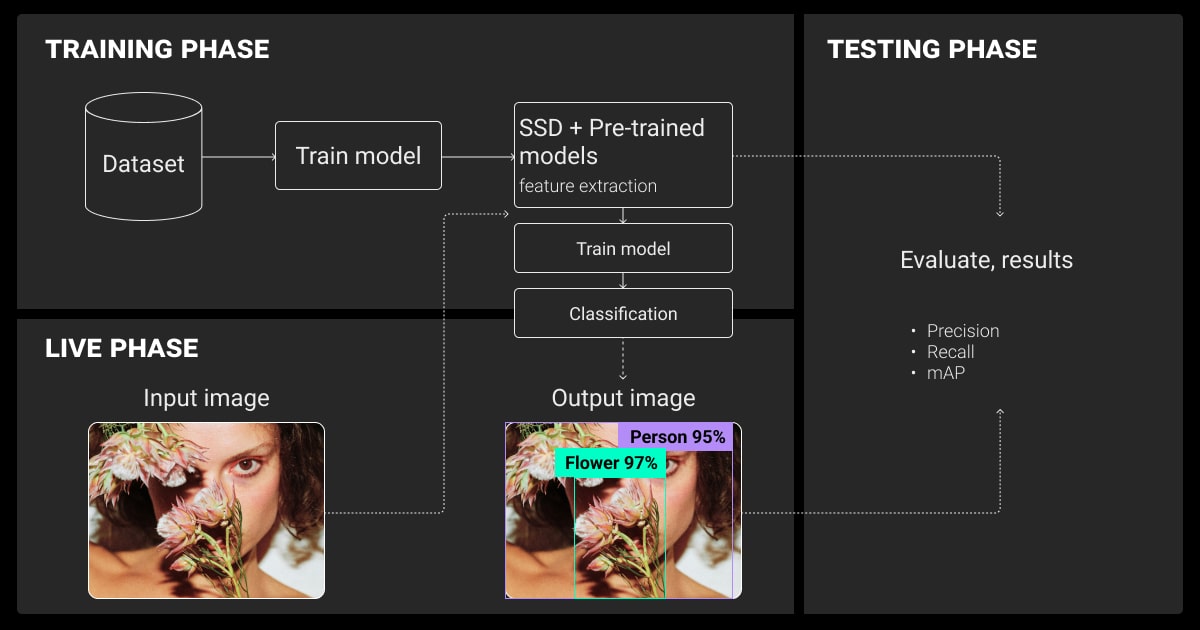
SSD (Single Shot MultiBox Detector)
This model gives you a good balance between speed and accuracy. It’s faster than Faster R-CNN, but not quite as accurate. An image annotation company might use this for general image annotation.
Faster R-CNN
If your application relies strictly on accuracy, this is your best option. Be warned, it’s like video segmentation, expensive in terms of computing power. This model uses Region Proposal Networks (RPN) for object localization in image and video annotation services.
No matter how sophisticated, a model is only as good as the data it's trained on. Your training dataset should be representative of the real-world scenarios your system will encounter. That includes variations in lighting, occlusion, and scale, which should all be reflected in the data.

Implementing OpenCV Object Detection Step by Step
Want some top tips from data collection services and image annotation services? Learn how to bring object detection to life with step-by-step examples using OpenCV in real-world applications.
Using Pre-Trained Models
| Step | Code | Description |
| 1. Load classifier | face_cascade = cv2.CascadeClassifier(cv2.data.haarcascades + 'haarcascade_frontalface_default.xml') | Loads a pre-trained Haar cascade for face detection. |
| 2. Load image | image = cv2.imread('path_to_image.jpg') | Loads the image you want to analyze. |
| 3. Convert to grayscale | gray_image = cv2.cvtColor(image, cv2.COLOR_BGR2GRAY) | Converts the image to grayscale, required by the classifier. |
| 4. Detect faces | faces = face_cascade.detectMultiScale(gray_image, scaleFactor=1.1, minNeighbors=5) | Detects faces in the image using specified parameters. |
| 5. Draw bounding boxes | for (x, y, w, h) in faces: cv2.rectangle(image, (x, y), (x + w, y + h), (255, 0, 0), 2) | Draws rectangles around each detected face. |
Training Custom Object Detectors
If pre-trained models don’t meet your needs, you can train your own. Follow these steps to get started.
Dataset Preparation
Collect labeled images. You can use public datasets like COCO or Pascal VOC if necessary.
Annotation Tools
You can use the following third-party tools commonly used with OpenCV:
- LabelImg (for bounding boxes)
- Roboflow (to preprocess and augment data)
Training Process
- Use TensorFlow/PyTorch to train a custom YOLO/SSD model
- Convert the trained model to ONNX for OpenCV compatibility
Annotation isn't just a step in the pipeline—it's the foundation for success. Even the best algorithms can't perform well if the annotation isn't clear, consistent, and precise. Once we improved annotation quality, the model became much more accurate, especially on smaller or obscured objects.

 President & CEO, DataNumen, Inc.
OpenCV Object Detection Performance Optimization
Want the best results while saving resources? These tips will help.
Real-Time Processing Techniques
Here are some ideas to improve running times:
- Use smaller input image sizes with smaller resolutions to increase speed
- You can use TensorRT or OpenVINO to optimize model inference
- You can use parallel processing by running inference on GPU
Handling Different Hardware Configurations
Choose one of these options based on your goals:
- CPU Optimization: Use OpenCV’s DNN module with Intel MKL optimizations
- GPU Acceleration: Use CUDA or TensorRT for NVIDIA GPUs
Processing the entire frame is often unnecessary. Adaptive ROI cropping and motion history analysis let you focus only on regions of interest, cutting down on compute while maintaining real-time accuracy. This method consistently improves performance in real-world, motion-heavy scenes.
 Founder, Deep AI
Best Practices and Common Challenges
What issues do data annotation services face when using OpenCV? Avoid common pitfalls and level up your accuracy with best practices from seasoned ML teams.
Dealing with Occlusions and Overlapping Objects
You should use non-maximum suppression (NMS) to filter overlapping detections in the machine learning algorithm. Also, improve your machine learning dataset diversity to include occluded objects.
This is especially important to make sure your model can deal with edge cases. For example, a pedestrian obscured by the body of a car.
Improving OpenCV Object Detection Accuracy
You can fine-tune models on domain-specific datasets to improve their performance overall. In addition, you can apply data augmentation techniques like rotation and scaling to increase the amount and quality of the dataset.
Monitoring Models in Production
You can use model drift detection to track performance degradation. Plus, you can implement logging frameworks to monitor false positives and false negatives.
Additional Resources
Want to learn more about OpenCV object detection? Here are some resources to get you started.
Recommended Tutorials and Documentation
We know it’s no fun to go through instructions, but here’s the link to the Open CV Official Documents. It’s well worth a look.
Want to learn how to use OpenCV? This tutorial will get you started.
Community Forums and Support Channels
It’s worth signing up to these two forums for useful advice:
About Label Your Data
If you choose to delegate data annotation, run a free data pilot with Label Your Data. Our outsourcing strategy has helped many companies scale their ML projects. Here’s why:
Rely on consistent, high-quality output for complex datasets, detailed taxonomies, and edge cases.
Get quality engineered into every step through onboarding, evolving guidelines, QA, and continuous feedback.
Adjust team capacity, project size, and delivery model as you scale, with no setup fees or long-term lock-ins.
Align on goals, workflows, and expectations with a team that integrates into your process from day one.
Work with former annotators who understand annotation complexity, quality standards, and high-volume delivery.
FAQ
What is OpenCV object detection?
Object detection, OpenCV python, is where we use OpenCV’s built-in tools and deep learning frameworks to identify and localize objects in images or videos. The system uses bounding box coordinates to precisely define each object, improving accuracy and efficiency.
Is OpenCV better than YOLO?
Both have their place. OpenCV provides an interface that you can run YOLO models on, but it doesn’t replace them completely. YOLO object detection is a deep learning model, while OpenCV is a computer vision library that supports multiple detection techniques. YOLO can be run within OpenCV using its DNN module.
What is OpenCV useful for?
OpenCV is a powerful tool used for image processing, face detection, real-time object tracking, feature extraction, and medical imaging. And that’s just the beginning—this open-source, free library is an essential resource for machine learning engineers looking to build and scale computer vision applications.
How to do image recognition with OpenCV?
- Install OpenCV and required libraries
- Load a pre-trained CNN model (e.g., YOLO, SSD, MobileNet)
- Read the input image using
cv2.imread() - Prepare the image (resize, normalize, convert to blob)
- Pass the blob through the network using OpenCV’s DNN module
- Parse the output to extract class labels and confidence scores
- Draw bounding boxes and labels on the image with
cv2.rectangle()andcv2.putText()
Written by
CEO of Label Your Data
Karyna is the CEO of Label Your Data, a company specializing in data labeling solutions for machine learning projects. With a strong background in machine learning, she frequently collaborates with editors to share her expertise through articles, whitepapers, and presentations.