3D Annotation: Techniques for Point Cloud Labeling

 CEO of Label Your Data
Table of Contents
TL;DR
- 3D annotation helps ML models interpret space using labeled point clouds for AVs, robotics, and AR/VR.
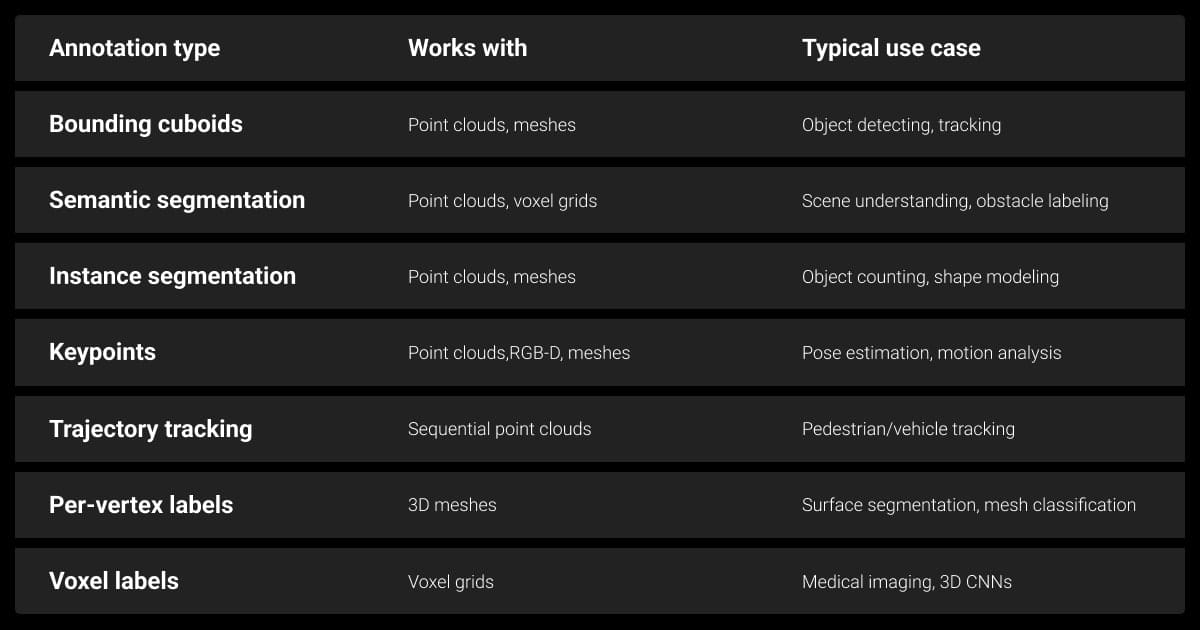
- Main techniques include 3D bounding boxes, segmentation, and keypoints.
- Common challenges include occlusions, sparse or noisy data, and syncing inputs from multiple sensors like LiDAR and cameras.
- Tools range from open-source options like CVAT and Open3D to enterprise platforms such as Scale AI and Segments.ai that offer automation and built-in QA.
- Outsourcing 3D annotation can boost efficiency, especially when in-house teams lack the tools or time to scale.
Why 3D Annotation Is Critical for Spatial Reasoning
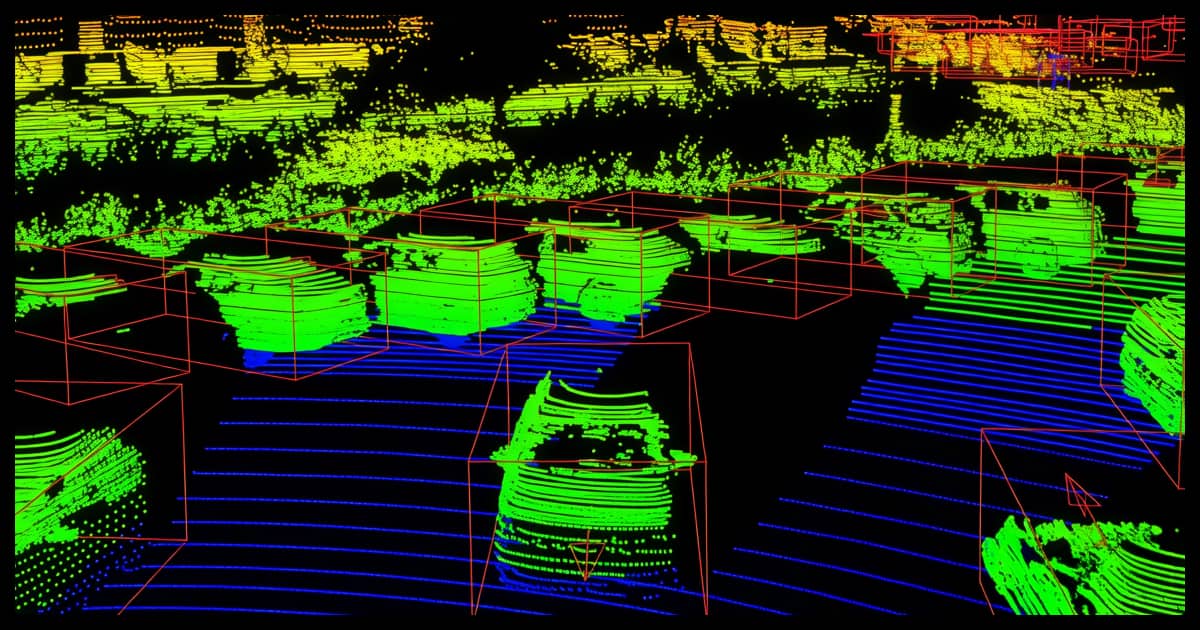
To the untrained eye, point clouds look like scattered dots. But to machines, they’re structured representations of the real world. 3D annotation gives those dots meaning by telling models what objects are, where they are, and, when combined with temporal context, how they move.
Without it, robots can’t grab things, cars can’t drive themselves, and headsets can’t understand a room.
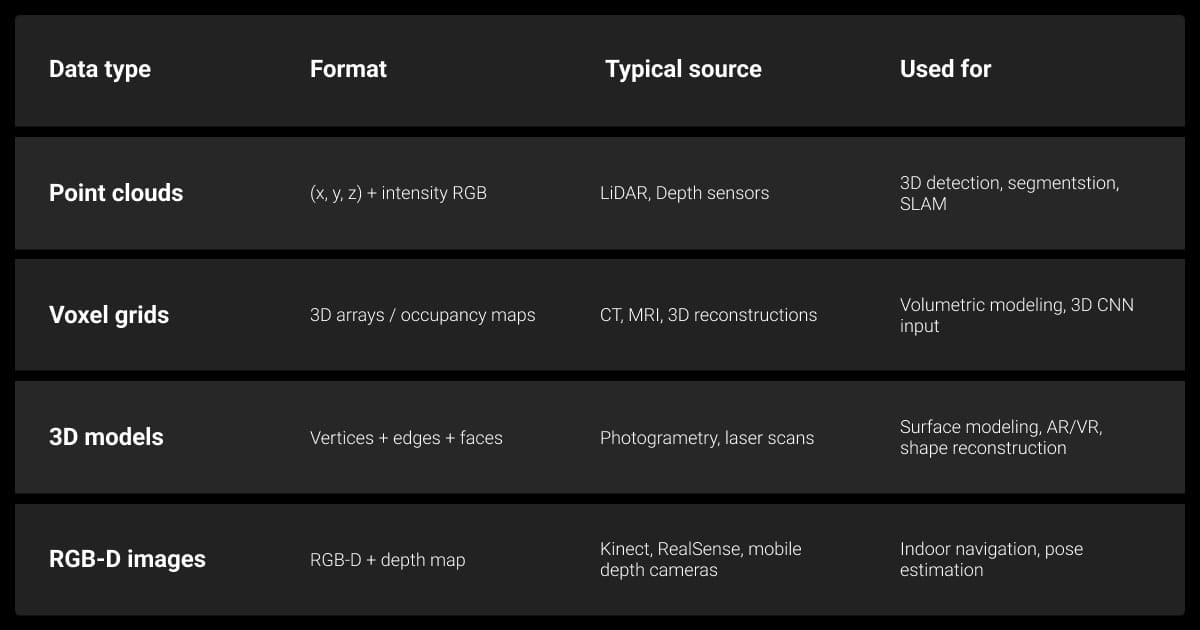
Unlike 2D annotation, which typically involves drawing boxes or masks on images, 3D works in full spatial coordinates. We’re talking LiDAR scans, stereo vision, RGB-D sensors, using real-world data that adds depth and complexity. It takes longer, but it’s essential for any system that requires spatial reasoning.
Real-World Use Cases
3D annotation is often the core of the entire system:
- Autonomous vehicles need labeled data to detect and track cars, bikes, and people in real time. They also need good image recognition to be able to recognize road signs.
- Robotics depends on spatial understanding to move through cluttered environments and interact with objects.
- AR/VR systems use point clouds to map physical spaces and blend in digital content.
- Smart infrastructure projects use annotated scans to monitor traffic, assess buildings, and plan improvements.
- SLAM (Simultaneous Localization and Mapping) systems use annotations to evaluate and improve environment reconstruction and navigation.
Challenges Unique to 3D Annotation
Labeling in 3D brings headaches you don’t deal with in 2D:
- Occlusions: Objects hide behind others. Annotators often need to rely on surrounding context or flag objects as partially visible, introducing uncertainty.
- Sparse, uneven points: LiDAR data is not uniform. Point density decreases with distance, angle, and reflectivity.
- Time-consuming: One frame can take minutes. Multiply that by thousands, or millions.
- Sensor fusion: Mixing LiDAR with camera feeds adds valuable context, but synchronizing and aligning data streams correctly can be complex.
When working with LiDAR data, it’s critical to identify and label outliers—like objects fading out of view—before model training. Set clear annotation rules that help the AI recognize what it’s seeing, then put those labels into practice and validate them. Reviewing edge cases through a human lens often catches what automated tools miss.

 Chief Marketing Officer, Nextiva
Core Techniques for 3D Image Annotation Workflows

There’s no one-size-fits-all method for data annotation but most teams rely on a few core techniques when working with three-dimensional data.
3D Bounding Boxes (Cuboids)
3D cuboid annotation (aka 3D bounding box annotation) marks the size, position, and orientation of an object in space, making it a critical and popular technique.
- Best for: Cars, pedestrians, objects that move and need tracking.
- Pros: Fast, easy, and works well with common object detection models.
- Cons: Not ideal for irregular shapes like trees, animals, or furniture.
Semantic and Instance Segmentation
This 3D image annotation method assigns a label to each point. Semantic segmentation groups them by category, for example, road, building, while instance segmentation separates individual objects within those categories.
- Best for: City scenes, indoor environments, or complex infrastructure with overlapping entities.
- Pros: Provides dense, high-precision labels that support fine-grained scene understanding.
- Cons: High complexity and prone to labeler inconsistency without strict guidelines.
Keypoint Annotation
Instead of labeling whole objects, you mark specific points, like elbows, fingertips, or object corners, with keypoint annotation.
- Best for: Tracking human motion, object pose estimation, or guiding robotic manipulation.
- Pros: Compact representation, often used in skeletal models or part detection. It’s also faster than standard 3D bounding box annotation.
- Cons: Requires a consistent schema and tight QA to ensure annotation quality across frames.
Comparing 3D Annotation Methods
| Technique | Use Case | Complexity | Tool Support |
| 3D Bounding Boxes | Object detection and tracking | Low | Widespread |
| Semantic Segmentation | Scene understanding | High | Moderate to High |
| Instance Segmentation | Object-level parsing | High | Moderate to High |
| Keypoint Annotation | Pose estimation, manipulation | Medium | Variable |
Note: Different model architectures, for example, PointNet++ and VoxelNet, may favor certain annotation formats over others.
Best Tools for 3D Point Cloud Annotation
Manual 3D point cloud annotation can be a slog. Fortunately, there are tools that help or at least make it less painful.
Open-Source Tools
If you’re bootstrapping or want control over the pipeline, open-source tools can get you started at a very reasonable rate:
- CVAT: Originally built for 2D, now supports basic 3D cuboids. Limited for dense annotation tasks.
- Supervisely: Adds 3D support on top of a 2D-first foundation.
- Open3D: More of a 3D data toolkit for visualization, preprocessing, and custom pipelines, not a full annotation suite.
The pros are that these image annotation tools are free, flexible, and customizable. The cons are that there’s a steeper setup and workflow learning curve. 3D support is often partial or evolving in these areas.
Commercial Platforms
If you’re working on a large scale or racing the clock, commercial platforms save you a lot of time.
- Label Your Data: Offers a frictionless 3D LiDAR annotation experience with API integration and tool-agnostic output.
- Scale AI: Blends ML-assisted pre-labeling with human-in-the-loop review.
- Segments.ai: Specializes in point cloud segmentation workflows.
- Viso.ai: Combines 3D annotation services with deployment and analytics tools.
These options often include pre-labeling, QA pipelines, and schema templates, which are ideal when you need accuracy, speed, and scalability.
3D Annotation Done Right: Field-Tested Tips
No matter which tools you use, good labels come from smart planning and constant checking.
Set Clear Labeling Guidelines
People don’t always agree on what a “car” is, or where the sidewalk ends. You need to set the LLM data labeling rules early:
- Define class boundaries
- Describe ambiguous edge cases
- Clarify what to prioritize, for example accuracy vs. throughput
Version Your Guidelines
Track changes to class definitions, edge cases, and QA rules. This avoids label drift over time and helps teams stay aligned as projects evolve.
Use Smart Pre-Labeling, Not Just Manual
You don’t need to label every frame by hand. Let automation do some of the grunt work:
- Use models (trained on similar or synthetic data) to generate draft labels
- Annotate keyframes and interpolate others when motion is smooth
- Leverage AI tools that suggest labels or flag uncertain regions
This goes beyond automation to accelerating human-in-the-loop workflows.
Validate With Model Feedback
Test labels against model performance. Use metrics like 3D IoU and mAP to catch issues early — annotation quality should improve results, not just look right.
Review, Audit, Repeat
You won’t get perfect labels on the first try. Build in structured QA:
- IoU (Intersection over Union): Check label accuracy against ground truth.
- Class distribution audits: Look for class imbalance or rare object underrepresentation.
- Frame coverage: Identify skipped frames or unlabeled regions.
Tighten feedback loops and iterate, better data leads to better models.
We found that 3D annotation accuracy improved when we focused on key landmark points first—like anchors—and then refined object boundaries. This helped us manage complexity without overwhelming our team and made the overall annotation process more consistent and scalable.
 CEO, Magic Hour
Technical Constraints to Plan For
Some of the biggest headaches come from the data itself, not the labeling process.
File Formats and Sensor Compatibility
Not all tools support every format, and conversion can introduce bugs.
- LAS/LAZ: Standard in geospatial work
- ROS bag: Common in robotics; requires unpacking into usable formats
- PLY/PCD: Widely used open formats in research
- BIN/PCAP: Frequently used in autonomous driving datasets (e.g., KITTI, Waymo)
Your data annotation strategy should look out for metadata loss, compression issues, and format-specific quirks.
Sparse/Noisy Data
Raw point clouds aren’t clean. Expect:
- Gaps from occlusion, low reflectivity, or low-resolution sensors
- False points from reflections or multipath effects
- Misaligned frames or duplication from sensor jitter
Denoising and preprocessing steps, like voxel downsampling, outlier filtering, and ground plane removal, can improve annotation quality.
Still looking for better labeled dataset quality? You can use synthetic data to provide your machine learning algorithm the extra information it needs. Great news, Meta recently released a free synthetic data toolkit to make this even easier.
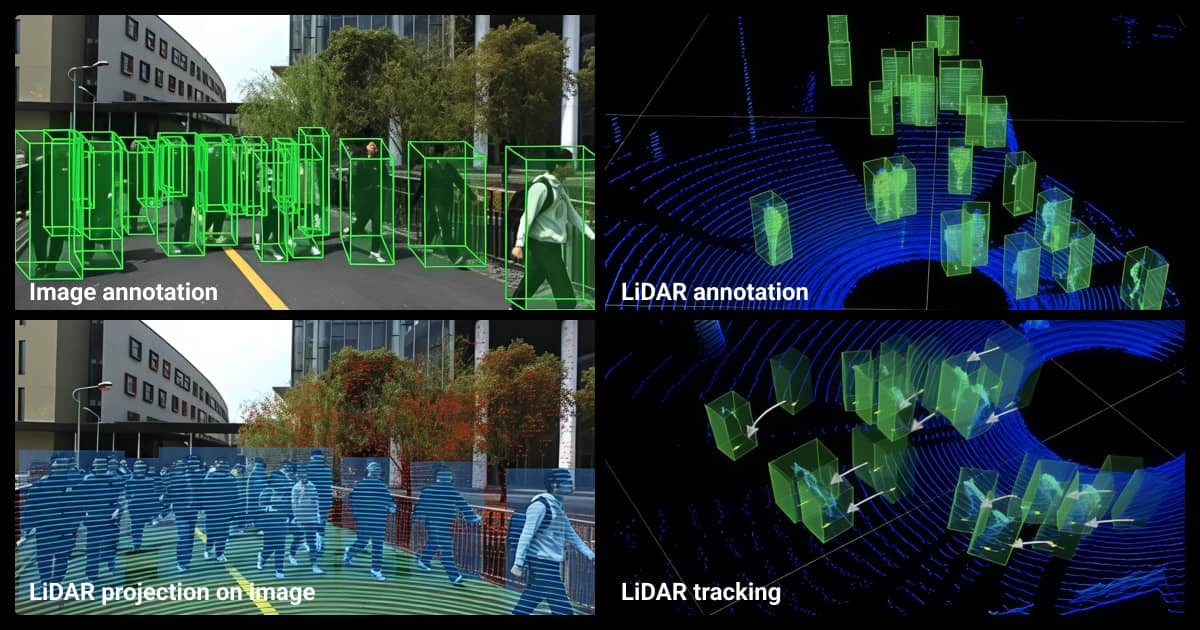
Multimodal Data Alignment
Combining LiDAR annotation with RGB or thermal imagery improves label quality, but only if calibrated precisely.
- Sync timestamps accurately
- Calibrate extrinsics and intrinsics between sensors
- Correct for rolling shutter or distortion
A slight misalignment can cause systemic labeling errors.
If your 3D data is too sparse, noisy, or incomplete for reliable annotation, consider partnering with data collection services that specialize in sensor calibration, LiDAR scanning, or multi-modal capture. High-quality input makes downstream annotation dramatically easier.
Why 3D Annotation Is Better Outsourced
You can do it in-house, but once the volume grows, outsourcing to a data annotation company is often the only way to stay productive. It’s tempting to automate as much as possible, but there are distinct advantages to keeping humans in the loop.
What Vendors Handle for You
Many teams underestimate how well 3D annotation services and video annotation services can manage complex 3D workflows, including rare classes, multi-sensor data, custom schemas, and QA at scale. These teams bring deep experience and mature pipelines.
They often use proprietary tools optimized for performance, reducing turnaround time and increasing consistency.
When In-House Breaks Down
In-house labeling may be practical for a small, experimental machine learning dataset or academic R&D, but it quickly breaks down in production due to time, tooling, and quality demands. Data annotation tools can help, but you’ll fall behind eventually. Then you have to consider whether saving on data annotation pricing is worth being the last to market with your prototype. At that point, outsourcing to data annotation services not only saves you time but also serves as a strategic infrastructure upgrade for your 3D project.
About Label Your Data
If you choose to delegate data annotation, run a free data pilot with Label Your Data. Our outsourcing strategy has helped many companies scale their ML projects. Here’s why:
Rely on consistent, high-quality output for complex datasets, detailed taxonomies, and edge cases.
Get quality engineered into every step through onboarding, evolving guidelines, QA, and continuous feedback.
Adjust team capacity, project size, and delivery model as you scale, with no setup fees or long-term lock-ins.
Align on goals, workflows, and expectations with a team that integrates into your process from day one.
Work with former annotators who understand annotation complexity, quality standards, and high-volume delivery.
FAQ
What is a 3D annotation?
It’s the process of labeling spatial data (like point clouds) so machine learning models can understand and reason about 3D environments. These labels tell models what an object is and how much volume it occupies.
What is 3D LiDAR annotation?
This is where you label the output from LiDAR sensors, often using bounding boxes, segmentation, or keypoints. The goal is to train perception models that can understand depth, shape, and movement in a 3D environment.
What are the challenges of annotating sparse or noisy LiDAR data?
Occlusions are a common problem: objects are partially hidden or truncated due to sensor angles or line-of-sight limitations. Low-density regions, especially those farther from the sensor, can make it difficult to recognize object boundaries or distinguish between overlapping classes.
Additionally, environmental noise and sensor artifacts can produce false positives, requiring careful preprocessing. In practice, annotators must often fuse LiDAR with RGB data to increase confidence in label placement, and quality control steps like manual review or automated uncertainty detection are essential for maintaining annotation reliability.
How to annotate 3D point clouds for human action recognition?
- Identify key joints such as shoulders, elbows, knees, and wrists to track motion across frames.
- Use keypoint annotation tools that support 3D skeleton mapping to label joint positions.
- Label sequences over time to capture movement patterns rather than static poses.
- Leverage RGB-D fusion (if available) to improve spatial accuracy and visibility.
- Ensure temporal consistency by reviewing annotated frames in motion to catch drift or errors.
- Choose the right tool: Open3D, MMAction2 (for downstream modeling), or a custom 3D annotation setup.
- Validate with model feedback, especially if labels are used to fine-tune pose estimation or action classification models.
How do I choose between open-source and commercial 3D annotation tools?
Deciding between open-source and commercial data annotation tools depends on your project’s scale, complexity, and team capabilities. Open-source tools like CVAT or Open3D are ideal for teams with strong internal engineering support and limited budgets. But they often require custom integration and maintenance.
On the other hand, commercial tools are optimized for usability, come with support, and typically offer advanced features like 3D label propagation, version control, and built-in QA. If you’re running a large-scale, multi-sensor annotation pipeline or working under tight deadlines, commercial platforms are your best bet.
Written by
CEO of Label Your Data
Karyna is the CEO of Label Your Data, a company specializing in data labeling solutions for machine learning projects. With a strong background in machine learning, she frequently collaborates with editors to share her expertise through articles, whitepapers, and presentations.