Polygon Annotation: Tools, Techniques, and Best Practices

 CEO of Label Your Data
Table of Contents

TL;DR
- Polygon annotation traces object boundaries with vertices, delivering 15-30% higher IoU than bounding boxes but taking 3-10x longer to create.
- Use polygons for segmentation models (Mask R-CNN, YOLOv8-seg) and when boundary precision matters; use boxes for standard detection or tight budgets.
- Modern AI tools like SAM cut annotation time by 40-60%, but still require human correction for fine boundaries and occlusions.
What Is Polygon Annotation in Computer Vision?
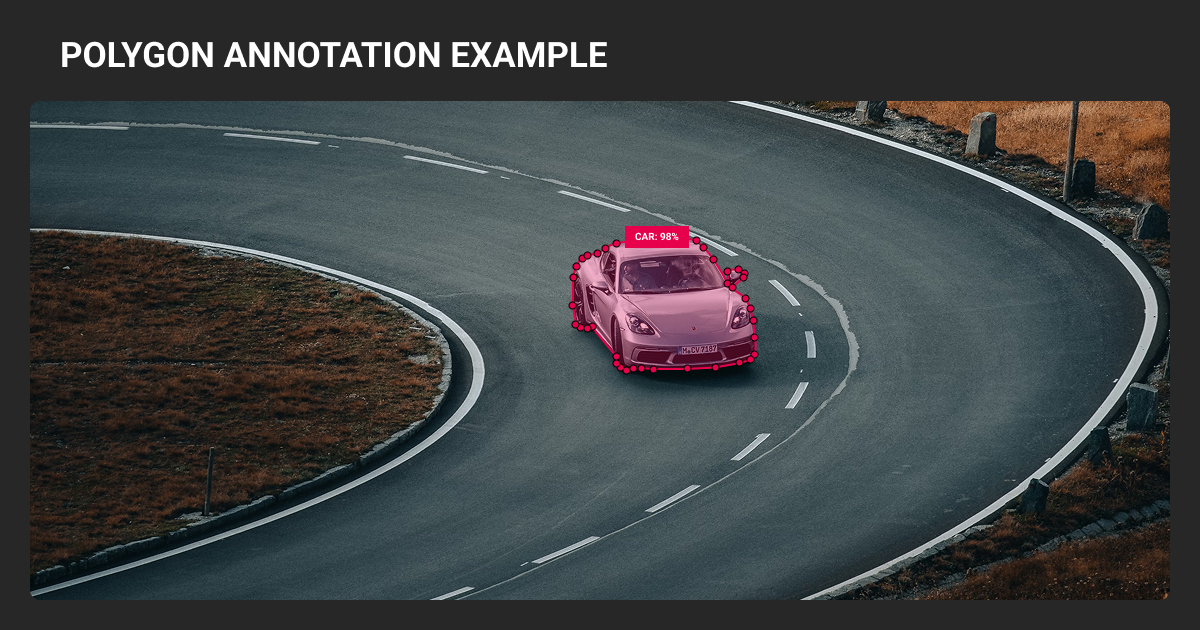
Polygon annotation traces object boundaries with connected vertices to create pixel-precise training masks. If you’re building Mask R-CNN, YOLOv8-seg, or U-Net models, you can’t train without these labels: the architecture requires pixel-level ground truth.
This precision makes polygons essential for training machine learning algorithms that require pixel-level accuracy.
Here’s the budget reality: polygons take 3-10x longer than bounding boxes, which directly impacts data annotation pricing. Cityscapes’ annotations averaged 90 minutes per image for fine-quality labels versus 7 minutes for coarse versions. That’s why most teams hit the same wall: precision costs real money and time.
The format follows your task. Semantic segmentation labels pixels by class. Instance segmentation needs separate polygons per object. Panoptic segmentation combines both. If your model outputs boxes, use bounding box annotations. If it outputs masks, you need polygons.
When to Use Polygon Annotation
Use polygon image annotation when your model architecture requires pixel-level masks for image recognition and segmentation tasks, or when boundary precision directly impacts your application. For standard object detection outputting boxes, polygons are overkill.
Segmentation ML models need pixel-wise ground truth. Mask R-CNN, U-Net, DeepLab, and YOLOv8-seg expect training masks from polygons. You can’t train these with box labels unless using weakly supervised learning techniques, which underperform.
Best polygon annotation use cases
| Domain | Specific Applications | Quality Standards |
| Autonomous Vehicles | Vehicle/pedestrian instance masks, road semantic labels | Waymo: 28-class panoptic for 100k images. Lane markings use polylines, not polygons |
| Medical Imaging | Tumor/organ boundaries in MRI/CT scans | FDA/CE require expert validation. Target 0.75-0.85 inter-annotator IoU |
| Agriculture | Crop monitoring, disease detection | Drone/satellite imagery analysis |
| Geospatial | Building footprints, terrain features | Aerial image segmentation |
| Retail | Product shelf monitoring, inventory tracking | Irregular packaging shapes |
| Industrial | Component inspection, damage assessment | Quality control, maintenance planning |
These applications rely on high-quality machine learning datasets with precise boundary annotations.
When bounding boxes work better
Boxes are sufficient when:
- Detection-only models: YOLO/Faster R-CNN output rectangles, polygon training doesn’t help
- Budget constraints: 100 boxes/hour vs 10-30 polygons/hour per annotator
- Early prototyping: Validate pipeline with boxes, add polygons for final accuracy
- Simple shapes: Documents, packages, rectangular objects
- Tiny objects: <10x10 pixels make detailed polygons impractical
One study found 0.007 ROC AUC difference between box and polygon training for vehicle detection: boxes deliver most value at fraction of cost for pure detection tasks.
Polygon Annotation Tools and Features
Modern annotation platforms offer AI-assisted labeling and efficiency features that significantly reduce polygon drawing time. The key is knowing which features actually matter for production workflows.
Essential polygon annotation tool capabilities
AI-assisted annotation:
- SAM-based tools: Click positive/negative points to auto-generate polygons. Meta's research showed 5x faster for straightforward cases
- Correction reality: 30-50% of masks need refinement for fine boundaries, occlusions, class ambiguity
Manual efficiency features:
- Auto-point placement, edge snapping, polygon snapping
- Hotkeys: SPACE (close), SHIFT+CLICK (remove point), CTRL+Z (undo)
Export formats:
- COCO JSON (standard for instance segmentation)
- YOLO-compatible (YOLOv5-seg, v7, v8 normalized coordinates)
- RLE encoding (alternative for dense masks)
Most polygon annotation companies and platforms like Roboflow, CVAT, Supervisely, and V7 now offer AI-assisted labeling to compete on turnaround time, though implementation quality varies.
Manual vs AI-assisted annotation
Production teams report 2-5x speedup using hybrid workflows: AI pre-labels, humans refine.
| Approach | Speed | Label Fidelity | Cost | Best For |
| Manual | Slow | High (with skilled annotators) | Higher labor cost | Complex edge cases, quality-critical projects |
| AI-assisted | Fast | Variable (requires review) | Lower labor, higher setup | Large datasets, clear boundaries |
| Hybrid | Medium | Highest | Balanced | Most production projects |
If you’re correcting 50%+ of AI outputs extensively, time savings disappear. Monitor correction rates and maintain a manually labeled evaluation set to catch quality drift.
We rely on automated polygon pre-labeling tools, which generate initial contours. In tests, these tools required around 50% fewer vertex placements from human annotators. Once pre-labeling is done, our annotators focus on refinement instead of drawing full polygons. For irregular shapes, this reduces cognitive load and accelerates throughput.

 CEO & Tech Entrepreneur, InTechHouse
Managed polygon annotation services handle the operational overhead: recruiting annotators, maintaining quality standards, managing iteration cycles. This works well if you lack internal annotation teams or need specialized domain expertise (medical, AV datasets).
The Polygon Annotation Process in 8 Easy Steps
- Select tool and load images. Import dataset, choose polygon annotation tool from platform toolbar
- Place vertices along object edges. Click strategic points following the contour. Place vertices at sharp corners first (corner-priority strategy). Add more points along curves, fewer on straight segments.
- Close the shape. Press SPACE or click starting point to complete polygon
- Assign class label. Select from predefined taxonomy
- Refine vertices. Zoom to 200-400% and adjust points. Often 20-40 vertices balances precision and speed, but depends on object curvature, image resolution, and task requirements.
- Handle occlusions. Annotate visible portions only. Close polygon along the occlusion boundary with a straight line. Don’t guess hidden shapes unless doing amodal segmentation.
When Label Your Data worked with Nodar on their 3D depth models, we ran into the same occlusion challenge most teams face during polygon image annotation: how do you label a car when half of it disappears behind a building?
Our solution was straightforward: annotate only what’s visible, document the decision in shared edge case logs. That consistency mattered more than perfect guessing. We labeled 60k objects this way across automotive and agriculture scenes.
- Review annotations. Check for gaps, overlaps, background inclusion
- Export dataset. Choose format matching your ML framework (COCO JSON, YOLO .txt)
Master hotkeys to double annotation speed: experienced annotators keep one hand on keyboard (mode switching, undo) and one on mouse (placing vertices).
The pilot phase saves everything. For AirSeed Technologies, Label Your Data handled terrain segmentation for drone reforestation: large geofiles in QGIS, complex terrain types, tight timeline.
We started with 50 test polygons per annotator. Our QA reviewer and account manager caught guideline ambiguities immediately. Zero rework needed after that first round. The project ran 5 months with 6 people and delivered 30+ geofiles on time.
That’s the workflow we use at Label Your Data — test guidelines on small batch, fix confusion early, then scale.
Common Challenges and Solutions
Polygon data annotation introduces quality and efficiency problems that directly affect machine learning model performance.
The main issues: annotation inconsistency, time consumption, and label noise propagation.
| Challenge | Impact | Solution |
| Annotation inconsistency | Can measurably degrade model performance | Detailed guidelines, calibration sessions on 50-100 images, regular QA audits |
| Time consumption | 3-5x slower than boxes (simple objects) to 8-10x (complex shapes) | AI-assisted tools, batch processing, experienced annotators |
| Complex boundaries | Errors at edges, reduced mask IoU | Domain expert review, reference images, iterative refinement |
| Occlusion handling | Incomplete or contradictory training data | Clear protocols: annotate visible only vs estimate full shape |
| Edge case ambiguity | Label confusion across team | Decision log with visual examples, team consensus process |
How annotation variance affects models
Inconsistent labels introduce noise that degrades model convergence and boundary quality.
Cityscapes compared two independent expert annotations of the same images: they achieved 96-98% pixel agreement after QA. That 2-4% disagreement represents your quality ceiling. Models can’t reliably exceed the consistency of their training labels.
Inter-annotator agreement thresholds vary by domain. For natural images and autonomous driving, aim for IoU >0.85. Below that signals unclear guidelines or undertrained annotators.
Medical imaging accepts 0.75-0.85 for tumor margins due to inherent boundary ambiguity, but requires adjudication by senior experts.
Real time costs
Cityscapes’ fine annotations took 90 minutes per image for dense street scenes versus 7 minutes for coarse versions. That 13x multiplier bought marginal quality gains.
Expect 3-5x longer annotation time for moderate complexity objects versus boxes. Highly detailed shapes can hit 8-10x. A 10k image dataset might need 300-800 hours depending on object complexity, plus 20-30% QA overhead.
Working with an experienced data annotation company ensures access to trained annotators and established QA workflows without building internal teams.
Label noise propagation
Data augmentation transforms annotation errors along with images. A 2-pixel gap in a mask becomes a differently positioned gap after rotation. If annotators consistently leave borders outside objects, those halos appear in multiple augmented variants, teaching models that objects have fuzzy edges.
Augmentation doesn’t average out noise; it amplifies it. This manifests as models predicting extra fragments or missing thin structures.
Best mitigation: clean annotations before training, use loss functions robust to boundary noise.
Polygon Annotation Best Practices from Our Team
Pre-production setup
Document polygon annotation computer vision guidelines with visual examples before starting.
Cover vertex density rules, occlusion protocols, and edge case decisions. Run a calibration phase: give 50-100 sample images to multiple annotators, measure inter-annotator IoU. If below 0.85 (general tasks) or domain threshold, hold review sessions to align understanding.
Test guidelines on pilot batch of 50-100 images. Catch ambiguities early when fixes are cheap, not after labeling 10k images.
I define when to use polygons versus boxes or brushes so everyone works the same way. I also set vertex density guidelines: fewer points for larger objects, more for intricate ones. That balances speed with accuracy. We track annotation speed and consistency using IoU thresholds and regular consensus checks to ensure accuracy across the team.

During production
- Vertex placement: Often 20-40 points balances speed and precision, but depends on object curvature and resolution. Add points until deviation stays within 1-2 pixels. Too many creates noise, too few misses contours.
- Occlusion handling: Pick one rule and apply uniformly—annotate visible portions only OR estimate full boundaries. Document the decision.
- Edge case logging: Maintain shared doc for ambiguous situations. When annotators hit unclear boundaries, log the decision with a screenshot for team reference.
Quality control
Implement multi-stage review: self-check → peer review → expert validation. Insert control images (pre-validated annotations) to catch drift.
Monitor agreement with IoU targets:
- Natural images/AV: 85-90%
- Medical/safety-critical: 90-95%
Random re-label 5% of completed work monthly. Growing divergence between original and re-labeled versions signals need for recalibration.
Version control who labeled what and when. Enables rollback if guidelines shift.
Polygon annotation gives you the precision segmentation models need, but takes 3-10x longer than boxes. Use it when boundaries matter: autonomous vehicles, medical imaging, agriculture, etc.
If you need hundreds of annotation hours delivered consistently, polygon annotation outsourcing eliminates the cost of hiring, training, and managing an internal annotation team while maintaining the multi-stage QA your model depends on.
About Label Your Data
If you choose to delegate polygon annotation, run a free data pilot with Label Your Data. Our outsourcing strategy has helped many companies scale their ML projects. Here’s why:
Rely on consistent, high-quality output for complex datasets, detailed taxonomies, and edge cases.
Get quality engineered into every step through onboarding, evolving guidelines, QA, and continuous feedback.
Adjust team capacity, project size, and delivery model as you scale, with no setup fees or long-term lock-ins.
Align on goals, workflows, and expectations with a team that integrates into your process from day one.
Work with former annotators who understand annotation complexity, quality standards, and high-volume delivery.
FAQ
What is the difference between bounding box and polygon annotation?
Bounding boxes use two clicks to create rectangles: fast but include background noise. Polygons trace actual contours with multiple vertices: 3-10x slower but deliver 15-30% higher mask IoU. Use boxes for detection models outputting rectangles; use polygons for segmentation models requiring pixel-level masks.
What is a polygon annotation?
2D polygon annotation traces object boundaries by connecting vertices to form closed shapes stored as coordinate arrays. Tools rasterize these into pixel masks for training segmentation models like Mask R-CNN, YOLOv8-seg, and U-Net.
The format follows your task: semantic segmentation labels pixels by class, instance segmentation gives each object unique polygons.
What is polyline annotation?
Polyline annotation creates open-ended lines without closing the shape—no filled region. Use for linear features: lane centerlines, power lines, river paths.
Key distinction: polygons are closed and fill interior pixels, polylines are open strokes. Autonomous driving datasets use polylines for lane markings, and polygon annotation computer vision for vehicles.
What are the three types of annotations?
Main types: bounding boxes (rectangular frames), polygons (contour-following shapes), and keypoints (joint/landmark points). Also semantic masks (pixel-level class labels) and polylines (linear features).
Choice depends on architecture — detection needs boxes, segmentation needs polygons, pose estimation needs keypoints.
Which polygon annotation tool is best?
Depends on workflow needs. Roboflow: SAM-based smart polygons, easy YOLO export. CVAT: open-source, auto-edge snapping. Supervisely: polygon snapping, auto-point placement.
Key features: AI pre-labeling (40-60% time savings), export formats matching your framework, hotkey support, QA workflows.
Written by
CEO of Label Your Data
Karyna is the CEO of Label Your Data, a company specializing in data labeling solutions for machine learning projects. With a strong background in machine learning, she frequently collaborates with editors to share her expertise through articles, whitepapers, and presentations.